

Blog . PSD to Vector with Illustrator
Blog
PSD to Vector with Illustrator
11/19/14 | Posted by | Posted in Digital Creativity
I don’t know about anyone else, but there have been plenty of times when I’ve wanted to convert something I’ve made in Photoshop to a vector image, but I never knew how. My searches always brought up someone proclaiming that such a thing is impossible to accomplish, or I would find a twenty-page paper that would explain (poorly) how to do it.
WELL FEAR NOT.
I have recently discovered a simple way to convert your raster-based images to a vector-based image in less than five minutes!
Find Your Image
First, pull up your image in Photoshop. If you have any layers that you don’t want to be in the image when you convert, delete or hide them. It’s a good idea to flatten your image as well before transferring. When you’ve managed your layers and flattened your image, go ahead and File>Save As so that way you still have your original file and this new one you wish to convert. (Keep it a .psd)
Enter: Illustrator
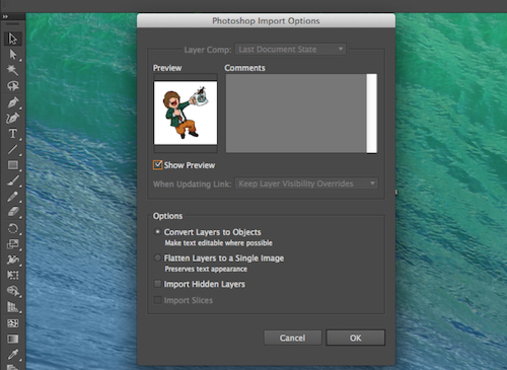
Now that we’ve prepped our file, go ahead and open Illustrator and go to File>Open. Find the .psd you just finished saving in Photoshop and click open.
A window should pop up labeled “Photoshop Import Options.” In it are three options: Convert Layers to Objects, Flatten Layers to a Single Image, and Import Hidden Layers. If you’ve already flattened your .psd choose Convert Layers to Objects. If not, choose Flatten Layers to a Single Image. Click OK.
Tracing Can Be Fun Sometimes
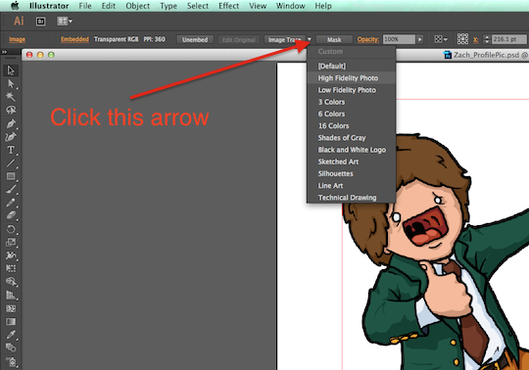
Now that we’ve opened up our .psd in Illustrator, we are ready to change this baby into a vector image. To do so click on your image to select it, and make sure a box shows up around it.
Near the top you should see a bar that says Image on the far left and something like: Embedded…Transparent RGB… PPI: … Unembed… Edit Original… Image Trace… Mask… Opacity… etc.
Click the little arrow next to the dialogue box that says “Image Trace.” A drop down menu should appear with a few options, these control how Illustrator handles the colors in your image. When you click on one, Illustrator will begin to trace your image and turn it into a vector-based image.
So Many Choices
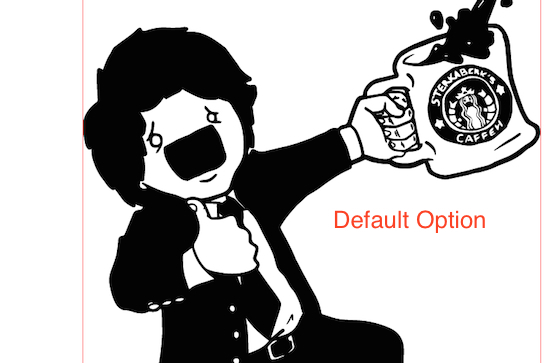
If you click the Default option, there’s probably going to be some problems. By default, when Illustrator traces an image it will turn your image into a black and white image. Unless you’ve got a logo or picture that only uses black and white, Default is probably not the option you’d like.
The choices are pretty straightforward. 3,6, and 16 Colors will trace your image and look for the 3,6, or 16 most prominent colors in your picture when it traces. If you’ve only got those many colors in your file, go ahead and use those.
Shades of Gray and Black and White Logo will convert your image using shades of gray and black and white respectively.
Sketched Art, Silhouettes, Line Art, and the Technical Drawing options are great if you are tracing a low color image or a scan of a drawing.
If you’ve got more than 16 colors in your image, or want Illustrator to trace a high quality photo, High Fidelity and Low Fidelity Photo options are the choice for you.
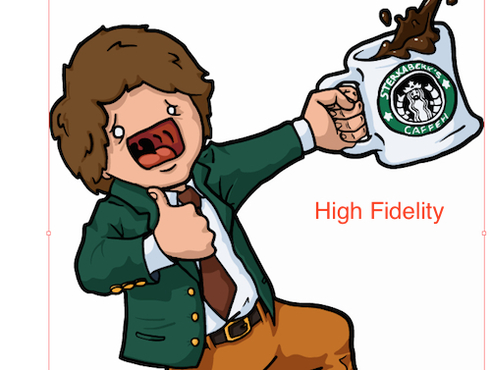
Choose the option you think will fit the best, or just click through all of them. You’ll get some pretty cool results with some, and some pretty weird results with others. If you have no clue which to choose, I would go with High Fidelity because it’s going to recognize all of your colors (most of the time) and your quality will stay high.
Results
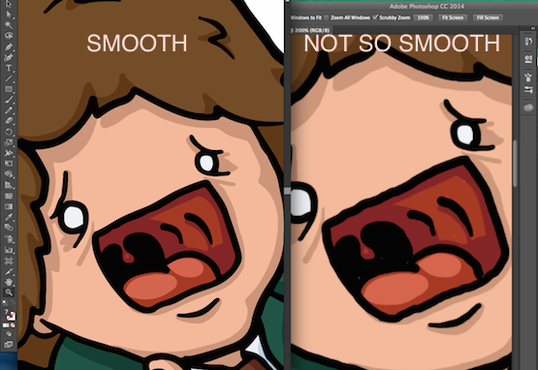
If all went well, congrats! Your .psd is now a vector image! Use your newfound powers for good, and think of all the new possibilities! (This is beautiful too, if you aren’t comfortable in Illustrator)
Happy Arting!!
-
Comments
0

- Tweet