

Blog . Ice Cream Product Design
Blog
02/24/14 | Posted by | Posted in Digital Creativity


A Look into My Work Flow
I'm currently a sophomore in the Illustration department. This week, I decided I wanted to shake it up a little and give you guys a little insight into how I work on an assignment for one of my Illustration classes. I'm going to be using a bag design project that I'm currently working on in my Principles of Illustration class. For this project we had to pick a company and design a bag for them. I chose to use Mitchell's Ice Cream as my company. I'll be sharing my thought process and how I felt as I worked on it.
The Ideation and Prototype Phase
Before jumping into anything too deep I wanted to plan. For this project I started off with tons of thumbnails. Before I even got to my final idea I had to painfully go through a lot of rejected ideas and ones that plain just didn't work. Even before I chose Mitchell's as my final company, I tried other ideas like packaging for a gaming mouse or packaging for a card game. I just didn't like those ideas and they just weren't working for me. I kept asking my professors for advice and they would let me know what was working and what wasn't. Personally, this was a hard process for me because I tend to have trouble either refining ideas or sticking with one idea. Eventually, I just scrapped all my ideas and tried something fun like just messing around with the shape of the bag. I started messing around and sketching out hot air balloons and trying to make them look like bags. I did a few ideation sketches until I felt like I had a decent idea down, and eventually made a prototype bag. I like the way it looked, but I didn't like the hot air balloon idea. Then I thought “Well it looks like ice cream and there's a Mitchell's nearby, so why not make a bag for them.” So that's how I got to my final idea. I did some sketches and some refinement and started working on the final. I actually laughed to myself because I spent so much time going through ideas, until I loosened up and found one I liked.
Working and Measuring
Before I even started working in the computer on my final bag, I had to figure out the measurements of it. This was one of the harder parts for me to do, but also kind of fun. I decided to do some “research” and find out how big a pint of ice cream from Mitchell's is in circumference so I could base my measurements off of that. Plus, I got to eat ice cream for an assignment so I could use the carton in my presentation. After figuring out most of my measurements I started working on my illustrations for the bag.
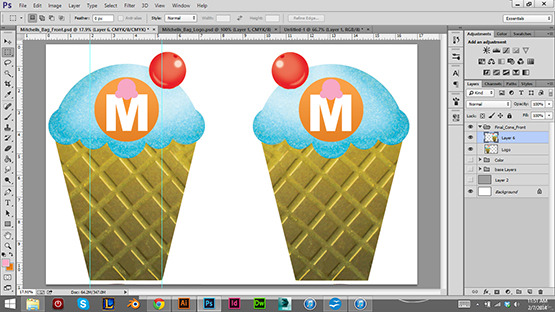
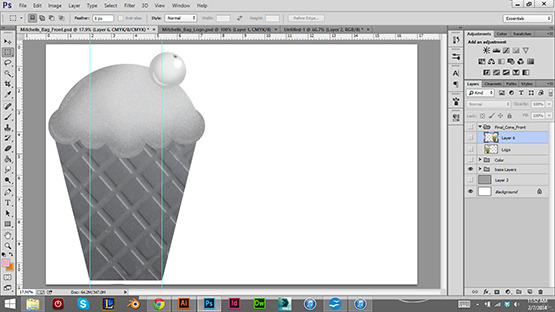
I worked in grayscale first, making sure that I had a nice range of values (lights and darks), which would help it look more dynamic. I also pulled some texture from Plaintextures.com, a site that I talked about from another blog post, and used a couple textures from there to help make my illustration stand out. For the cone I used a piece of a manhole, I made a couple of edits to it and sped up my workflow. I was actually debating with myself whether I wanted to traditionally draw the bag then scan it in, or do everything digitally. I felt that doing it digitally would be faster and also give me a better looking bag based on my digital vs. traditional skills. After I felt good about my grayscale I went ahead and started adding color. I already had a color scheme in mind. I wanted to use more saturated colors to make the cone look more appealing. I also figured out beforehand where I wanted to put the logo, which I remade in Illustrator. I also wanted the sides of the bag to look a lot simpler just so that the main focus would be more on the front of the bag.
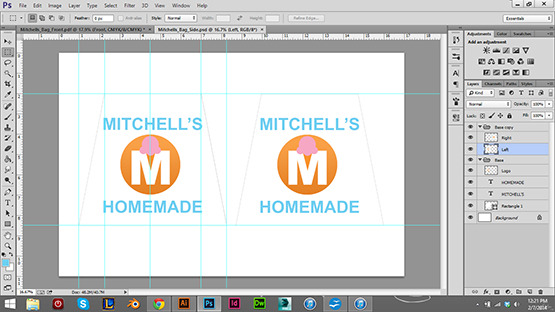
The sides were the easiest part, I didn't have to do any painting, I just had to reuse my logo and figure out what text to use. I had to measure again for the sides, and I made sure to measure twice for this. I wanted the main focus to be on the front of the bag and not have the design become crowded.
I looked over everything then I printed it out. I actually found constructing it to be very easy as well. It was very relaxing too, because all I was doing was cutting out the pattern with an Xacto knife and gluing it together. I had to be careful, but I did print out an extra copy just in case something went horribly wrong. I took the paper handles from a bag that I had lying around my house and colored them green for the handle.
Final Touches
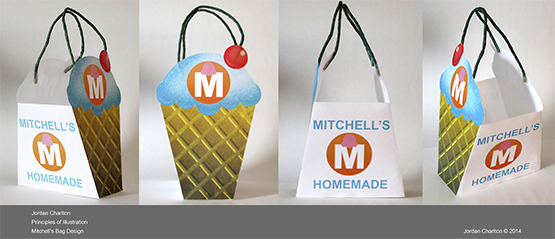
One of the very last things to do before the presentation was to take some photos of the bag. This way, I had some pictures of the actual constructed bag for my portfolio. At The Cleveland Institute of Art we have access to a lot of great photography equipment, but I improvised with what I had in my room. I was able to set up a small space using some left over paper I had as a back drop. I grabbed almost every lamp in my house to set up some cheap lighting. After taking the photos I did some quick adjustments in Photoshop and set up a final board in InDesign for my critique. A lot of artists will come at different problems from different angles, and it might not be the same for each project. It's all dependent on the problem that you need to solve at the time, your client will have a lot of say in what you do based on what they want as well. I hope you liked this little insight into how I work.
-
Comments
0

- Tweet