

Blog . Pinnacle Studio
Blog
09/06/12 | Posted by | Posted in Digital Canvas - Apps & Accessories
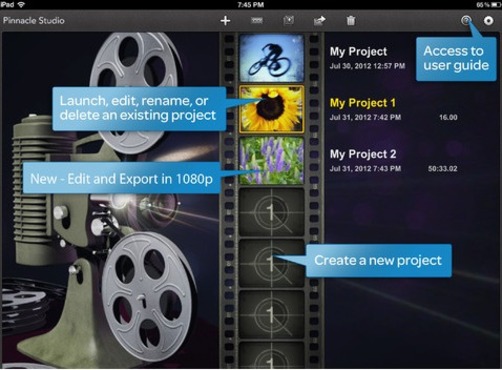


Pinnacle Studio Pinnacle Studio (previously "Avid Studio") is a swift, comprehensive video editing application available free for a limited time in iTunes. Users have the ability to import Audio, Video, and Images directly from their iPad, or record this media within the application. Precision editing, montages, and transitions are only a few of the amazing tools Pinnacle offers. Continue reading below for an in-depth view of Pinnacle's features. [youtube http://www.youtube.com/watch?v=8R9fGtZ-OR0] Creating a New Project: To create a new project file, tap either the "+" icon in the top horizontal menu, or any of the empty slots in the central filmstrip on the home page. **Help: For instant access to the full user guide when editing, return to the home screen by tapping the "home" icon in the top left corner of the screen. Once you have returned to the home screen, tap the "?" icon in the top right corner (see image below). Importing Media:
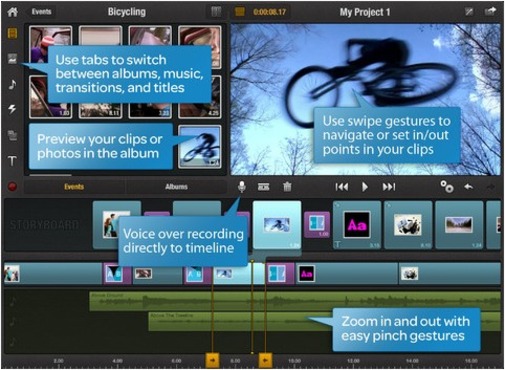
- To import Video clips, tap on the filmstrip icon (underneath the home icon). Tap and drag your clip into the Storyboard section at the bottom of the screen.
- To import still Photos, tap the photo icon (underneath the video icon mentioned above) and tap and drag desired photos into your Storyboard section.
- To import Audio, tap on the music note icon. You can include up to three audio tracks in your video from your iPad's music library (in addition to the audio already present in your video clips. These are visible in the second timeline directly underneath the storyboard, beneath respective video clips. Tap this audio twice to adjust volume and fade settings.) Tap and drag desired tracks into the third timeline section at the bottom of the screen - there will be a music note icon on the far left. Edit an audio clip by tapping it twice: change the volume, audio fade in/out, or delete.
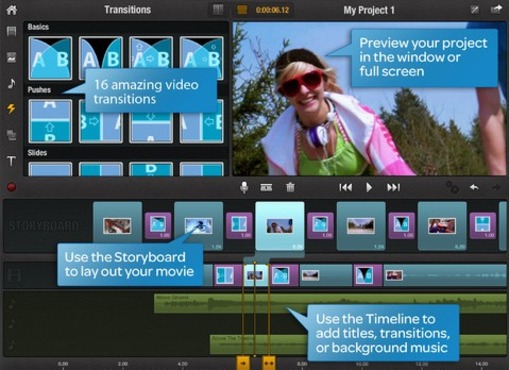
- Transitions: (Tap the lightning bolt icon)There are a total of sixteen available transitions, including Basic, Pushes, and Slides - preview each by tapping on it once. Simply drag your desired transition between two clips in your "Storyboard" section. You can adjust the length of a transition by tapping and dragging the orange beginning and end points within the Storyboard, the same as adjusting the length of your video clips.
- Montage: (Tap the polaroid pictures icon) You can include an photo montage within your movie - this only works with still images. Preview each montage effect by tapping on it once ; choose between Aerodynamic, Extreme, Instant Photo, Multilayer Mix, Neon, and Tribute options. Once you have chosen your desired montage, tap and drag it onto your storyboard. Next, go to your photo gallery and drag photos you wish to include into the montage you placed on your storyboard. You will then have a choice of numbered slots to place your photos into. If you choose a montage effect that includes text, simply play the section on your timeline with the montage, pause the clip, and tap on the "Your Text Here" line. A window will appear in which you can change the font, size, fit, and color of any text you want to include.You can adjust the length of a montage by tapping and dragging the orange beginning and end points within the Storyboard.
- Titles: (Tap the "T" icon) There are a variety of Motion and Standard titles you can place within your storyboard. Preview each by tapping once, insert by tapping and dragging your desired title onto your storyboard. To customize the text, play the section on your timeline with the title effect, pause the clip, and tap on "Your Text Here." Type in your text, and tap and drag to place your title anywhere within the preview screen - minimize or enlarge this text by tapping on two opposite corners of the orange box around the text and dragging. You can adjust the length of a title by tapping and dragging the orange beginning and end points within the Storyboard.
-
Comments
0

- Tweet