

Blog . 3D Modeling for Illustration
Blog
05/02/14 | Posted by | Posted in Digital Creativity


3D is a great tool!
Earlier in the year, I made a post about 3D sculpting. Sculpting and 3D modeling in general are great mediums that are worth taking a look into. I think a lot of Illustrators should explore 3D modeling because there are a lot of interesting things you can do with it. For example, you can use 3D modeling to get a better perspective. You can use very simple boxes to model out a cityscape. You can move the camera around and play with the perspective so that you can get the composition you want and draw from that. You can render out a grayscale image of the scene and create a digital painting from it.
Before you start
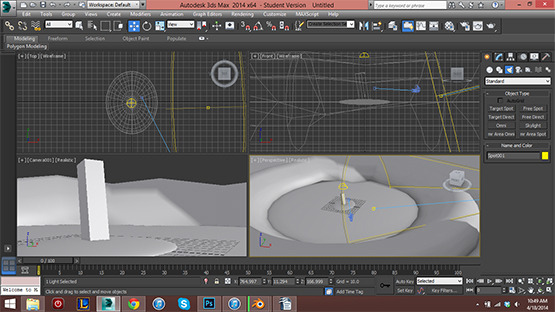
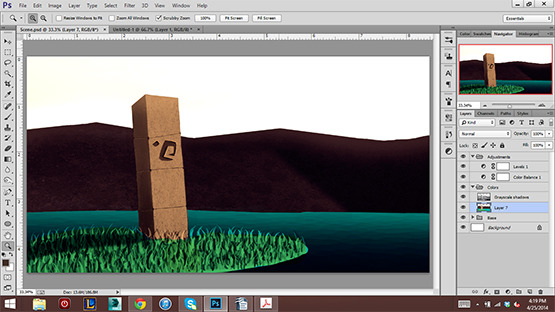
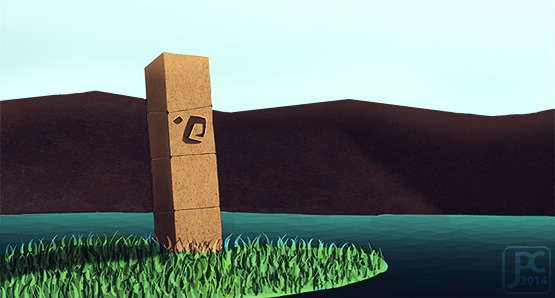
For this demo I'm going to be working on an image that I was planning on using for my business cards and include in my portfolio. I got a rough idea of what I wanted to do and planned it out with some sketches. I'm going to be using 3DS Max for the modeling, and Photoshop to finish rendering the image and digitally paint it. I modeled all of the basic shapes in 3DS Max and planned out the basic composition for what I want to paint. I set up some simple lighting within the scene. Next, I render the image as I would normally with whatever size dimensions I want. I usually save the file as a PNG file for a higher quality image to work from, and also for the transparent background. After rendering the base I load up Photoshop. I create a new file with slightly larger dimensions than my render, but I make sure to keep the same ratio in terms of size. A resolution of 300-400 dpi usually works for me if I plan on printing it. I cropped my image and started working on my grayscale painting. Since all of my major shapes are already blocked in thanks to 3D modeling, I just have to start rendering the details. I notice that I could push some of the darks in this image since it is very light in value. Usually, I start with the biggest level of detail then work my way back into the smaller details. I'll take some textures and position them on top of various elements of my painting. I took a gravel texture I found online and overlayed it on top of the stone pillar in the painting to give it a rougher look. After I finish my grayscale work I copy all of my grayscale layers then combine them into one. I set this layer to multiply and put a layer underneath named "base color."I lay down big blocks of color on this layer and use the grayscale “shading layer” as a guide for where to fill in with color. I go back in and paint details. I make some adjustment layers and play with the levels, contrast, brightness, color balance, and the saturation. I save two versions of my file, a high quality one and a lower quality version to post online. This is a quick demo of the process that I use to take a 3D scene and turn it into an Illustration. I hope this trick helps and inspires you to experiment!
-
Comments
0

- Tweet